C
Chris@TSE
Guest
First of all, I'd like to apologize to all those who asked me to post instructions for our hatchling \ juvie racks weeks back. It's been a proverbial madhouse here lately but since I'm home laid up with a back problem for the next couple of days I figured I'd take a moment to follow through.......
These instructions are for what I call a "half rack". This system can be "doubled" and stacked on top of each other for a 48 bin system rather than just 24. We've built quite a few of these over the past couple of months. They work great, and the best part about the construction is not one peice of wood needs to be cut. These will be very rough instructions and can be edited as you see fit, I'll eventually take the time to make a "step-by-step" list with photos one of these days...
First go out to home depot, lowes, or your largest chain hardware store. Somewhere they will have precut and finished sheets of melamine for shelving and such. The common size we use is 3/4 x 15" - 7/8 x 36"
This is a standard size and each sheet should cost you anywhere from $5.99 to $7.99 each. Home Depot seems to have the best quality sheets in this size, the ones from lowes were thinner and the majority of them seemed to be warped.
For the 24 bin half rack you will need exactly 11 sheets, if you would like to build the full rack grab 22 sheets.
You'll need to purchase coated deck screws, the tan ones about 1.5" long work great and come with thier own bit for a drill. You'll need a nice cordless drill and a bit to pre-drill your holes. You'll also need one 6' extention cord for each half rack you plan to build and six 36" strips of 3" flexwatt heat tape. A reliable thermostat such as a johnsons controls unit or helix would be required as well. We use 6qt sterilite tubs, one of the most common sizes available priced anywhere from .88 to 1.00 each.
Some electrical tape, foil tape to hold down and affix the heat tape, a soldering iron and some solder are the last remaining tibits youll need for the project. All in all a fully operational half rack minus the thermostat should cost roughly $140-$175 depending on what you pay for materials.
You simply lay down the first peice and drill your two sides to the outside of the first board. This will leave you with a "U". You place your tubs face down on the bottom of your starting point "U" and use about 8 index cards between EACH surface of your plastic tubs and the shelf it lays on to "space" them so sliding drawers in and out once assembled is a breeze. you can also use junk burned CD's or similar. Just make sure you dont skip this part or youll wish you had never been born, pulling the tubs out will drive you to suicide.
Then lay down the next shelf on top of the tubs you just set up and spaced and drill the sucker in. Be sure to line up the shelf, DONT PRESS DOWN when drilling, and predrill those wholes before driving in the screws.
Viola, your first shelf.
Simply repeat the process for each shelf.
Then comes the fun part, wiring the heating.
You'll have two boards remaining. Lay these on the back of your rack unit so they are covering the open rear of the unit. Lay your strips of heat tape down on these two boards in the proper locations for each shelf, leave some of each strip hanging off of one side. A good 1"-1.5" should be sufficient. Tape them down in place with the foil tape, and then flip the boards over and drill them in place.
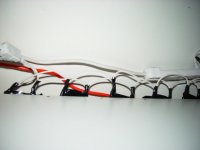
Now simply wire your rack...... cut the extention cord you purchased up into pieces of appropriate length and daisy chain the connections, melting the plastic off each electrical lead to expose a surface fit enough for solder, and then solder each one and wrap with electrical tape when finished. If you will be adding another unit be sure to wire in the receptacle end of the cord as well as the plug so an additional unit can be stacked and plugged right into the first one, sharing the same thermostat!
Once everything is wired plug the puppy in to a direct connection to see if each row heats up. Confirm each shelf is operational and you're set to go. Burn some holes in those tubs with your soldering iron, set it up, and add herps. You're welcome. Enjoy.
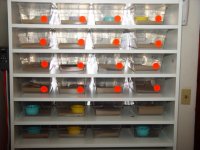
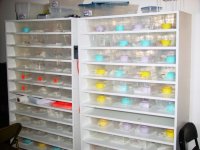
Below are photos of a half rack, a few full racks (stacked half racks), and a side view of the daisy chained wiring for the flexwatt heat tape.
Heating supplies were purchased from Matt at MG Reptiles. herpheat.com
Tell him Chris sent you....... Great guy, he'll do you right.
I know these are crude instructions but this will probably be one of the most cost effective and efficient racks you can build. If you have any questions shoot and I'll do my best to answer them.
These instructions are for what I call a "half rack". This system can be "doubled" and stacked on top of each other for a 48 bin system rather than just 24. We've built quite a few of these over the past couple of months. They work great, and the best part about the construction is not one peice of wood needs to be cut. These will be very rough instructions and can be edited as you see fit, I'll eventually take the time to make a "step-by-step" list with photos one of these days...
First go out to home depot, lowes, or your largest chain hardware store. Somewhere they will have precut and finished sheets of melamine for shelving and such. The common size we use is 3/4 x 15" - 7/8 x 36"
This is a standard size and each sheet should cost you anywhere from $5.99 to $7.99 each. Home Depot seems to have the best quality sheets in this size, the ones from lowes were thinner and the majority of them seemed to be warped.
For the 24 bin half rack you will need exactly 11 sheets, if you would like to build the full rack grab 22 sheets.
You'll need to purchase coated deck screws, the tan ones about 1.5" long work great and come with thier own bit for a drill. You'll need a nice cordless drill and a bit to pre-drill your holes. You'll also need one 6' extention cord for each half rack you plan to build and six 36" strips of 3" flexwatt heat tape. A reliable thermostat such as a johnsons controls unit or helix would be required as well. We use 6qt sterilite tubs, one of the most common sizes available priced anywhere from .88 to 1.00 each.
Some electrical tape, foil tape to hold down and affix the heat tape, a soldering iron and some solder are the last remaining tibits youll need for the project. All in all a fully operational half rack minus the thermostat should cost roughly $140-$175 depending on what you pay for materials.
You simply lay down the first peice and drill your two sides to the outside of the first board. This will leave you with a "U". You place your tubs face down on the bottom of your starting point "U" and use about 8 index cards between EACH surface of your plastic tubs and the shelf it lays on to "space" them so sliding drawers in and out once assembled is a breeze. you can also use junk burned CD's or similar. Just make sure you dont skip this part or youll wish you had never been born, pulling the tubs out will drive you to suicide.
Then lay down the next shelf on top of the tubs you just set up and spaced and drill the sucker in. Be sure to line up the shelf, DONT PRESS DOWN when drilling, and predrill those wholes before driving in the screws.
Viola, your first shelf.
Simply repeat the process for each shelf.
Then comes the fun part, wiring the heating.
You'll have two boards remaining. Lay these on the back of your rack unit so they are covering the open rear of the unit. Lay your strips of heat tape down on these two boards in the proper locations for each shelf, leave some of each strip hanging off of one side. A good 1"-1.5" should be sufficient. Tape them down in place with the foil tape, and then flip the boards over and drill them in place.
Now simply wire your rack...... cut the extention cord you purchased up into pieces of appropriate length and daisy chain the connections, melting the plastic off each electrical lead to expose a surface fit enough for solder, and then solder each one and wrap with electrical tape when finished. If you will be adding another unit be sure to wire in the receptacle end of the cord as well as the plug so an additional unit can be stacked and plugged right into the first one, sharing the same thermostat!
Once everything is wired plug the puppy in to a direct connection to see if each row heats up. Confirm each shelf is operational and you're set to go. Burn some holes in those tubs with your soldering iron, set it up, and add herps. You're welcome. Enjoy.
Below are photos of a half rack, a few full racks (stacked half racks), and a side view of the daisy chained wiring for the flexwatt heat tape.
Heating supplies were purchased from Matt at MG Reptiles. herpheat.com
Tell him Chris sent you....... Great guy, he'll do you right.
I know these are crude instructions but this will probably be one of the most cost effective and efficient racks you can build. If you have any questions shoot and I'll do my best to answer them.