• Responding to email notices you receive.
    **************************************************
    In short, DON'T! Email notices are to ONLY alert you of a reply to your private message or your ad on this site. Replying to the email just wastes your time as it goes NOWHERE, and probably pisses off the person you thought you replied to when they think you just ignored them. So instead of complaining to me about your messages not being replied to from this site via email, please READ that email notice that plainly states what you need to do in order to reply to who you are trying to converse with.

  • IMPORTANT! PLEASE READ!! About the Google Adsense ads being displayed

    =====================
    Posted 08/15/2025
    =====================


    Yeah, I know. They are a pain in the butt. But they pay the bills to keep my server running. Just a fact of life, I am afraid.

    Want to get rid of them? Simple. Just become a Contributor level member or above and they will be gone. -> Please click HERE."

    Is that too much for me to ask of you to keep this site running? Well, sorry about that. I too wish I could get everything for free. But alas.....

    =====================
    Addendum: 01/10/2026
    =====================


    Google Adsense ad revenue for December, 2025 was just $30 over the cost of the lease for the server running this site. So, in effect, the money providing the incentive for me to continue running this site is coming SOLELY from the paid memberships and sponsorships here. Which honestly ain't much....

BRB custom display cage (re)build!

Charis

New member
Joined
Jul 31, 2009
Messages
812
Reaction score
15
Points
0
Location
Pocatello, Idaho, USA
We got these two homemade 4x2x2 cages in a trade we were very happy with, even though they were quite rough and have needed a number of weekends worth of work and a good bit of money sunk into them. They are finally nearly finished though! My husband has done almost all of the work on them and has done a great job. We replaced the plexi glass in the doors with Lexan, sanded, repainted, caulked and just today put on the bottom liner. Still have to finish rehanging the doors, installing the Radiant Heat panels we've decided on, the LED light bars we've found and hanging the neat drift wood that came with the one cage in a way that it can be removed for cleaning. Plus we want to find something similar that we can do in the other cage. Figuring they are going to need at least a month or more to off gas as well before we can move Kaylee and Zoe into them.

This is the original before any restoration work.

cage1_zpsfjqysnbp.jpg


Floor removed and some sanding complete.

cage2_zpsadnkdqrm.jpg


All sanding complete with handles installed. Much easier to move!

cage3_zpsx9nztzkr.jpg


Partially painted. About the only part I helped with.

cage4_zpsjpdm4xku.jpg


cage5_zpsvqwu6lz6.jpg


All painting complete!

cage6_zps33d4fc3q.jpg


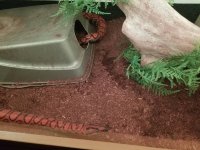
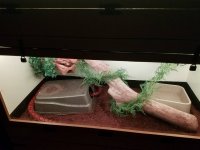
Floor complete and waiting to dry. Used herculiner to protect the floor.

cage7_zpsrknhdcyv.jpg


cage8_zpsn0uleqel.jpg


Will continue to update as this project comes along.
 
very nice work!. I usually like doing this kind of stuff when I find time & half way through find myself wondering if with the time I invested if I was better off spending a little more money & building from scratch. Either way at the end it's nice to have something you did & to be proud of...very cool!
 
Did a little more work on the cages this weekend.

We installed some small hooks in the back roof, to hang foliage from or whatever.

DSC_3091_zps3v64i8fx.jpg


And hung the drift wood back up in the one cage.

DSC_3089_zpsehqvf2mv.jpg


DSC_3088_zpsmfu8znlf.jpg


DSC_3087_zpscidkpsvy.jpg


They are now removable.

DSC_3086_zpsgri24uyb.jpg


DSC_3084_zpsmzskibrc.jpg


DSC_3083_zpsff2cs10x.jpg


Close up of the liner.

DSC_3085_zpsqnpvgee0.jpg
 
My husband got the lights installed today, they are quite neat. They have 18 different shades of colors and 4 settings. Two of the settings, like strobe, are migraine inducing and will never be used but the others are wonderful! The pictures don't really do them justice, hard to take a good picture. This first one will probably be the default setting, it is a nice soothing warm yellow.

DSC_3111_zpsqgqkokbn.jpg


DSC_3114_zpsgqegz6a7.jpg


DSC_3115_zpsv1uhgute.jpg


DSC_3116_zpsnscud6sd.jpg


DSC_3117_zps859lj6dj.jpg
 
This is sloooooowly coming together! Just got the heat panels here, installed and the doors put back on with new hardware and locks last week. Now just need to build a stand for them and they will be ready to move snakes into!

DSC_4475_zpsnymf1vhw.jpg


DSC_4476_zpsemyqwsja.jpg


DSC_4477_zpskyn5dmq3.jpg


New lock ...

DSC_4479_zpsjqavzqax.jpg


New hinges ...

DSC_4480_zps8wgpb1xn.jpg


Pardon the junk in the garage around them ...

DSC_4482_zps4yrygtay.jpg


DSC_4483_zpsidnvtvne.jpg
 
My husband had to work a ton of overtime and my mother in law got really, really sick for a long time (she's much better now) so these got put on the back burner. Finally had time to tackle some projects in the last few weeks, so he was able to set up the outbuilding as a work space and tackle building the stand for these.

Mostly done.

stand3_zpsji18trst.jpg


stand2_zpsmcp7fqn1.jpg


stand1_zpscxsnbqae.jpg


stand4_zpsxmpsdprc.jpg


Painted.

stand5_zpsb3z4pkbl.jpg


stand6_zpsu7g1xgat.jpg


stand8_zpstaplx7q1.jpg


stand7_zps4n78ggs3.jpg


Finally in the room and set up!!

enc1_zps8doozdbj.jpg


enc3_zpsxgj4tmdv.jpg


enc5_zps7gh6irsk.jpg


enc6_zpspp39k0xj.jpg


Got the enclosures partly made up now and the heaters and thermostats running. Will let them run for awhile to make sure everything is working right and then move the girls over into them. I'm so happy to finally have them almost ready!!
 
That is a nice enclosure project. I'm glad to see I'm not the only one that has projects like this get put on the back burner for so long.
 
Stand looks great too, much nicer than I have in mind. My enclosures are all in the basement, and occasionally when there's a really heavy rain water comes in under the door and spreads across the floor. I'm thinking to use small diameter pvc pipe and fittings to build minimal stands to raise the enclosures a few inches so they don't get wet, and allow the floor to dry quickly when it does happen. The alternative would be to have the concrete floor dug up to clear/replace the drain pipe, but the floor drain in the middle of the basement is fine. It's just the one outside the door that's partially blocked.
As for delays with completing projects, I started 5 plywood 4x2x2 enclosures last spring. Completed 2 that are in use, and just need to get glass for the 3rd to finish it now. The remaining 2 still need painted, the interior then sealed with polycrylic, and sliding glass tracks installed (as well as glass for them.) On the bright side though, I did order 6 T10's from AP that should be arriving this month sometime. :time_waiting_01:
 
Here are some kind of crummy cell pictures of Kaylee cruising her new digs tonight.
 

Attachments

  • k1.jpg
    k1.jpg
    104 KB · Views: 103
  • k2.jpg
    k2.jpg
    108.1 KB · Views: 112
  • k3.jpg
    k3.jpg
    64.1 KB · Views: 104
Back
Top