• Responding to email notices you receive.
    **************************************************
    In short, DON'T! Email notices are to ONLY alert you of a reply to your private message or your ad on this site. Replying to the email just wastes your time as it goes NOWHERE, and probably pisses off the person you thought you replied to when they think you just ignored them. So instead of complaining to me about your messages not being replied to from this site via email, please READ that email notice that plainly states what you need to do in order to reply to who you are trying to converse with.

  • IMPORTANT! PLEASE READ!! About the Google Adsense ads being displayed

    =====================
    Posted 08/15/2025
    =====================


    Yeah, I know. They are a pain in the butt. But they pay the bills to keep my server running. Just a fact of life, I am afraid.

    Want to get rid of them? Simple. Just become a Contributor level member or above and they will be gone. -> Please click HERE."

    Is that too much for me to ask of you to keep this site running? Well, sorry about that. I too wish I could get everything for free. But alas.....

    =====================
    Addendum: 01/10/2026
    =====================


    Google Adsense ad revenue for December, 2025 was just $30 over the cost of the lease for the server running this site. So, in effect, the money providing the incentive for me to continue running this site is coming SOLELY from the paid memberships and sponsorships here. Which honestly ain't much....

Our new modular snake rack

zn394

New member
Joined
Oct 17, 2009
Messages
46
Reaction score
8
Points
0
Location
Charlotte, NC
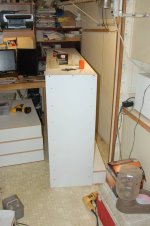
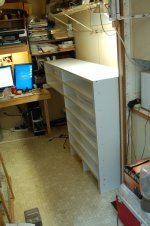
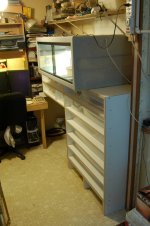
Several of our babies were ready for larger tubs, so a new rack was in order. I thought y'all might like seeing the construction since this one is a little different from the typical rack.

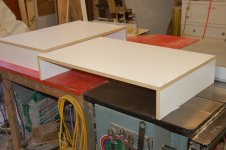
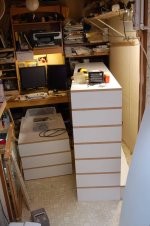
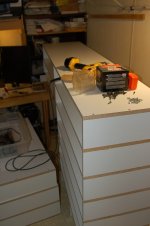
I made this in sections so it is easier to get it inside the house. Sterilite tubs were used for the entire rack. Each slot can accomodate one 41qt, one 28qt and one 15qt, or three 15qt tubs. Being able to find all three sizes that were the same height has allowed me to reconfigure the rack as needs change. It could even hold 6qt hatchling tubs with appropriately sized shims.

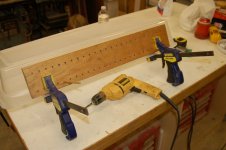
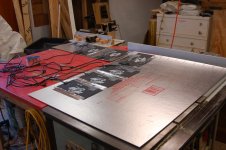
The first step is drilling the holes in the tubs. I haven't tried the soldering gun method yet since this works well for me and is fairly quick. I used a shelf hole drilling jig for the spacing.
 

Attachments

  • DSC_8595.jpg
    DSC_8595.jpg
    120.5 KB · Views: 273
Next I cut out the shelves and sides. Each shelf is 36 3/4" x 17 1/4" and each side is 5 3/4" x 17 1/4". Each level is assembled with one shelf and two sides.
 

Attachments

  • DSC_8602.jpg
    DSC_8602.jpg
    128.1 KB · Views: 268
After all the modules were assembled, I brought them into the house and stacked them in their final configuration.
 

Attachments

  • DSC_8598.jpg
    DSC_8598.jpg
    196.5 KB · Views: 261
  • DSC_8599.jpg
    DSC_8599.jpg
    146.6 KB · Views: 264
The end panels are cut from 1/4" hardboard with one side white. These are screwed into the ends of each module, making sure each module is aligned with the one below. Once all the ends are installed, the rack will not shift front to back.
 

Attachments

  • DSC_8600.jpg
    DSC_8600.jpg
    190.9 KB · Views: 267
The backs are next to go on. They are cut from 1/8" insulating board and sized to fit the rack. Once installed, the rack will not shift side to side and is now one solid rack. We had housed our snakes in tanks before I built our first rack, so we had several heating pads laying around. These will do until I decide on what size and configuration of heat tape to use. Here are the backs with the mats taped in place using aluminum tape.
 

Attachments

  • DSC_8597.jpg
    DSC_8597.jpg
    163.4 KB · Views: 268
And for a final touch, the top of the rack is a perfect place for the new Vision 422 that is home to our nearly 7' hypo BCI Betsy. Here we are - all finished and everyone enjoying their new, larger homes!
 

Attachments

  • DSC_8603.jpg
    DSC_8603.jpg
    205.4 KB · Views: 266
Looks good! I like the idea of doing the shelves individually like that and then using the sides/back to secure it all together. How did you secure the shelves together and the backs? Just screws or.... it's always been my dilemma with that.

I am going to be building another rack soon and I would like to borrow your idea on it. I will route a groove in the shelves first though to lay down the heat tape and then serpentine it through the rack.

Oh yeah, trust me on this one... you will absolutely love using a soldering iron as opposed to the drilling for the vent holes in the tubs. So much faster, easier, and cleaner. No sharp edges either. Just make sure you do it in a well ventilated area because the fumes of burning plastic isn't anything too nice.

At any rate, thanks for the step by step procedure on a great looking rack. I like it!
 
The sides are held to each shelf with screws, predrilled and countersunk. The backs are just predrilled and held with screws. Melamine (most materials for that matter) needs to be predrilled or it will split.

And thanks for the compliment.
 
That's a pretty cool design! If you don't mind, why is there an overhang? Are you putting another rack or tank under it? Good idea if you are! I've been toting with the idea of designing a rack that will hold a tank as a centerpiece so I can have it out in the room as a display!
 
That offset is just to fit my space. There is a desk there that would block some of the tubs below the ones that are there. I do have a hatchling rack that fits right underneath though for the future.
 
Back
Top