

• In case most of you have not noticed, I made changes to the donation amounts as well as the durations for all of the paid membership levels. Things are winding down here, and this seems to be the most prudent way to deal with the "end of life" period of this site.

    Contributor level members - $10 per 30 days
    Sponsors - Eliminated
    Benefactor level members - $25 per 30 days
    Endowment level members - $50 per 30 days

    Account Upgrades Page
  • Responding to email notices you receive.
    **************************************************
    In short, DON'T! Email notices are to ONLY alert you of a reply to your private message or your ad on this site. Replying to the email just wastes your time as it goes NOWHERE, and probably pisses off the person you thought you replied to when they think you just ignored them. So instead of complaining to me about your messages not being replied to from this site via email, please READ that email notice that plainly states what you need to do in order to reply to who you are trying to converse with.

Rack Building Help

mgoblue347

New member
Joined
Oct 16, 2011
Messages
720
Reaction score
25
Points
0
Location
Houston, TX
I've got the rack build down.

I was just wondering how I should run the flexwatt.

Will be a 7high 28qt/12qt rack.

I have the same exact rack more or less that is a 32qt/16qt and the flexwatt is just weaving down the rack back and forth in one strip, which leaves "bubbles" if you will, popping out from the side. Is there a better way to do this?

3" flexwatt btw.

Thanks!
 
Back when I built my own racks, I used to use one strip of flexwatt per level, with all of them plugged into a single power strip that was plugged in to the thermostat.

Depending on your room temps, you could get some wider flexwatt and run it down either the back or the rear sides.
 
On the one I made, I ran one strip of flexwat per level and "snaked" the wires to the next level. That way the flexwatt is flat on each level. But I am not going to lie, the wire work was a pain with the soldering iron I had
 
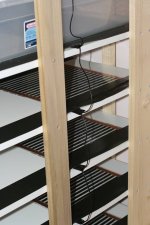
My husband just did an 8-level for 41 qt Sterilite tubs this week. The attached pic shows how he ran the electric - one side of it anyway. The THGHeat Connectors and were purchased from Reptile Basics, very easy to install with crimping pliers, which we had on hand already, so no soldering required.
 

Attachments

  • rack.jpg
    rack.jpg
    61.8 KB · Views: 113
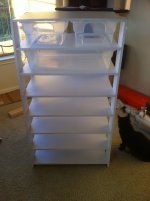
Great, thanks for everyone's suggestions. Brian, I use XPVC for my racks. I actually do solder the flexwatt in a series as you are saying Jessie. For my racks that pull out long ways not width ways, and yes that is a pain. I don't want to do a single strip per level and have 7 cords that will be a pain too. I also don't want back heat, has to be belly. I think I have something in mind that will hide the bubbles from coming out. Here is a picture of the finished rack, minus the flexwatt and back.
 

Attachments

  • photo(12).jpg
    photo(12).jpg
    213.6 KB · Views: 95
The cats love the racks! They are the reason I have to have a separate room for the snakes. Otherwise they'd be underneath and on top of the racks bothering the snakes all day and night.

Thanks for the comment Steve! What I think I am going to do is weave it down the rack the way that bothers me, but have the bulging parts flush with the back pieces. I will take pictures to show what I mean once the flexwatt arrives.
 
Back
Top